Showing posts with label tutorial. Show all posts

8.11.2011

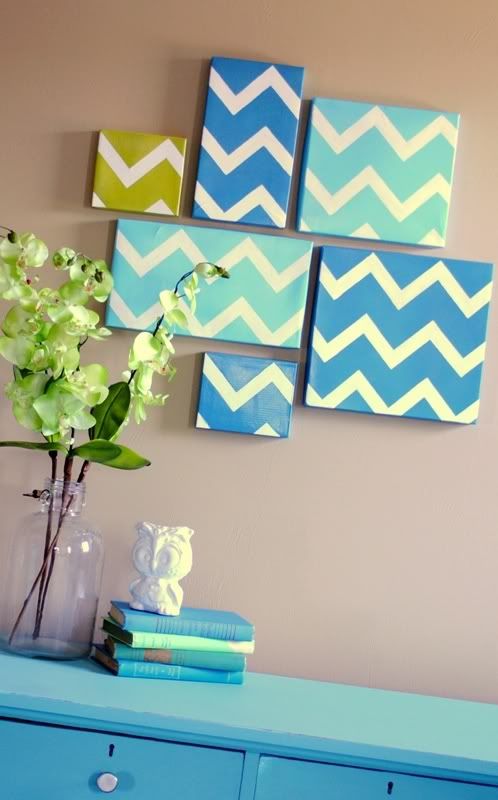
painting on shoe box lids.


***Updated--I guess this never posted?  Let me know if it did.  Im kinda confused on that!  So I will re-post it today! 

In the process of redecorating and refurbishing my room, I have decided to make most of the things I hang on the wall and decided I just possibly couldn't pass this idea up!

Photobucket

Notice how perfect and how well it was done?  Well here goes my version of it!  :)

I was a little creative and just used the basic idea!

Step one- Collect shoe box lids that have little to no damage to them.  
Lay out a lot of newspaper and start with white spray paint.


Step two- Spray them all, even the sides, with white spray paint primer. {or in my case, all we had was semi gloss white paint, but it still worked!} 


Step three- Wait for them to dry.  I probably left them for 1-2 hrs.  
then tape on the designs you want to make. I got the Chevron pattern from here


Step four- Spray paint over the lids with the colors of your choice.  I chose gray since it was simple and neutral.  {we also had it at home so i didn't have to go shopping}


The two spray pains I used were these:


Step Five- remove the tape from the lids when the paint has dried and voila! 


The American girl box didn't like the paint or tape that much and the white paint decided to come off so I had to do some white paint touch ups!


7.27.2011

Some new shorts.

Made from pants.  I have been wanting some khaki shorts for a while now and when I found something similar to these in my drawer that I haven't ever worn, I made them into shorts!  And now I love them! 

they go with anything! and its nice to have a break from the jeans and Nike sports shorts for a while!


They go with anything! Stripes, solids, colors, patterns, you name it! 
 
And they weren't that hard to re-fashion either!

cut, pin, hem, sew!

6.22.2011

A Little Crafting On a Warm Night...

Well I actually don't think it was a warm night... I was just thinking of a creative title...

Anyways... On to what I am about to show you!  It is really very simple, but I am in love with the way they turned out! 

I had my mom save a couple Pringles cans for me which wasn't too hard because it's my brothers favorite chip food.

{click on the picture for a larger view}


I need feedback!  Do you prefer the collage picture above for tutorials or written out step with pictures like i have here????  Comment to reply!


5.24.2011

Tutorial: Another flower...

****I apologize for this being so late, but it has been in the works for a couple weeks now and I just got around to finishing it today!****

Sorry for all the flowers... I'm sure you must get sick of them after a while...  
I don't know if I have many more flowers after this one though!
They are very easy and simple, but they look so professional!

Here goes!  
Step One:  Cut 5 or 6 circles out of fabric.

Step two:  Fold each circle in half, and then in half again to make a wedge.  Iron the wedges.  These make the petals of your flower!


Step three:  Sew a running stitch along the open and rounded edge of each petal, connecting each one to the first without cutting the thread in between petals. 


Step four:  Once you get to the end of the last petal, pull the thread so it gathers the petals in a circle.  Then tie it off tightly. 

Step five:  Next you are making the center of the flower.  Cut a strip of fabric however long you want.  Hot glue and twist the fabric to make a coil-type of circle.  Cut off the end if the strip is too long.  


Step six:  Hot glue the coil to the middle of the petals and Voila!


***Optional: Glue to a bobby pin, hair clip, headband, or anything else you think works!***

More to come!

5.17.2011

the many cards i've made this week...

My tutorial for this week is not really a tutorial...  its more of me just sharing...  
I am thinking of maybe posting another one this week if I can/have time...

There are many birthdays in the month of may.... so of course i have to make a lot of b-day cards as well as mother's day cards!!!

here are a few i did.... I would appreciate any more ideas!  


Email me with ideas here or just leave a comment!  


5.10.2011

Tutorial: Gathered Ribbon Flowers

I made these puppies for some friends of mine since i needed something quick and easy to give them... And they are!    Simple and Easy!  Here is the tutorial:

Materials needed:
  • Ribbon (doesn't matter if it has wire or not)
  • Sewing Thread 
  • Needle
  • Hot Glue Gun
  • Button
  • Hair clip/bobby pin (optional)
***I found that the ribbon with the wire actually works a little better because the thread will stay in the ribbon and you wont take that chance of the ribbon fraying there.

Step 1:
To secure the ends of the ribbon and make sure they don't unravel, burn the ends slightly so they melt and have a hard ending.

Step 2:
Cut about a 9 inch piece of ribbon.

Step 3:
Sew a running stitch right along one of the edges. (if it has wire, sew right along the inside of the wire)
Step 4:
Pull the two ends of the sewing thread together so the ribbon bunches up and creates a circle.
Step 5:
Tie the two ends of the sewing thread together.

Step 6:
Hot glue (you could also sew it) on a button or embellishment.
Step 7: {optional}
Glue or sew a hair clip or something similar on the back!

Here are a few I made for friends...

Cute but also super easy!

5.03.2011

Jazz up YOUR blog!

My last post in the Jazz up YOUR blog series is a simple short list of 10 Ways to Make Your Blog Better!


1. Include Pictures.
Most of your readers don't want to read pages of text.  Use bullet points, pictures and other visuals to break up lots of text.  

2. Going on a holiday? 
Don't let your blog die.  Write and schedule some good posts or have guests post and to be published ahead of time.  

3. Keep it simple.  
Don't clutter your blog with ads, widgets, or non-useful items.  

4. Make it easy for readers to contact you.  
Broadcast your email or the way readers can contact you easily and have it visible.

5. No inspiration?
Read!  Read anything you can to get inspiration.  If you find something, write it down so you don't forget!

6. Comment and link to popular blogs. 
You will get more traffic to your blog by promoting yourself on other blogs!

7. Respond to comments.    
If readers leave a interesting comment or have a question, reply back!

8. Sign up for Site Meter.
This way you can view what pages get looked at and how many people visit your blog!

9. Try writing about what your readers might want.
Include how-to's and keep your readers interested!

10. Have a theme. 
Incorporate your blogs background, header and name into a theme and stick to it.   It's okay to change it up just keep it consistent!

For a while on Tuesdays, I will keep it as a 'tutorial tuesday' and post craft tutorials!  It will definitely keep me busy!
4.26.2011

Jazz up YOUR blog!

This is the 2nd post in the series to experiment and make your blog more YOU!  In this post, I will show you how to add a specialized signature to the end of all your posts!


To design it, I just used this website.  It was the easiest!  Otherwise, if you want something different, you will have to design it using Paint, Picasa, Photobucket, Microsoft, or any of the other programs you like!


Step one:
Follow the steps on the online signature maker website to create it!


Step two:
When you get the to the step that says Finished, click "want to use this signature" to access the HTML code.


Step three:
Click "Generate HTML code"


Step four:
Click "Generate a code for my Handwritten Signature" which should be the first option.


Step five:
You will get the HTML code there.  Copy it.


Step six:
Log into Blogger.  Go to the 'settings' tab, then to 'formatting' under settings.


Scroll all the way down and where it says "post-template", delete any text that might be there and paste your HTML code into the box.  Click "Save Settings" and your done!  Every time you start a new post, your signature should be there and you can just type the post like normal but with the signature! You can deal with it as though it is a picture!


Voila!  You have your very own signature!
  Next week will be the last for the Blog tutorials, but there will mean there will be tons of more time for crafty blog posts!